
Required height
the minimum height for using a profile is 210cm. A minimum of 220cm and a maximum of 230cm is required to hang the Wheelylifts at different heights.
Mounting the profile system
- Decide whether you want to hang the Wheelylifts at the same height or at separate heights.
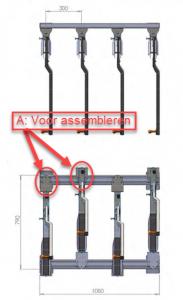
- If you want to hang the Wheelylifts at the same height, keep a height of 50cm from the ground. this applies to the underside of the lower profile. The distance between the top and bottom profile should be 85.5cm in this case. This is the distance between the top of the bottom profile and the bottom of the top profile.
- If you want to hang the Wheelylifts at two heights, higher and lower. Then you have to assemble the brackets differently, as shown in the picture and in the video. the lower profile must be hung at least 60cm, if you have a ceiling of more than 230cm, a height of 70cm is recommended. the top profile must be hung 73cm higher than the bottom profile. This is the distance between the top of the bottom profile and the bottom of the top profile
- Measure the correct height on the wall and drill the holes for the wall bracket (1) for the lower bracket. Once the profile has been placed on the bottom bracket, a bracket is also placed at the top. 6 brackets are placed per profile (type 1406). One hole per bracket is sufficient, but you can choose from 3 positions per bracket. Then screw the lower bracket to the wall with plug and bolt (2 and 3).
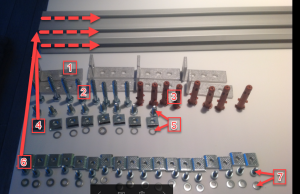 Place the profile on the 2 bolted brackets and slide the M8 plates (4) into the top of the profile, to fix the brackets to the profile. Do this using Allen key, screw and washer (5).
 - If the lower brackets are attached, do the same at the top of the profile. then do the same for the top profile.
- Once the top profile has been screwed on, slide the M6 plates (6) into the profile. three pieces per profile per Wheelylift.
- If you place the Wheelylifts at the same height, place two plates in the lower sliding surface and one in the upper one for each Wheelylift.
- If you hang up the Wheelylifts alternately. then place two places in the lower sliding plane for the first Wheelylift and one in the top one, for the next Wheelylift you have to do it the other way around.
- Screw the lower wall bracket to the profile using the M6 plates that have just been placed, the Allen key, screw and washer (7) in the correct measured place.
- Place the Wheelylift on the bottom bracket and screw it to the back of the Wheelylift (keep it flat (slanted) on the profile to reach it). Then screw the top wall bracket to the profile and to the rear of the Wheelylift.
- Tilt the Wheelylift back perpendicular to the profile and mount the arm according to the manual. Your Wheelylift is ready for use.